A Powerful Guide On Image Optimization For WordPress Websites
The size of the images on your website has everything to do with its page load time. A post by Kissmetrics on How Loading Time Affects Your Bottom Line stated that 47% of consumers expect a web page to load in 2 seconds or less. With image optimization for WordPress websites, you can insert as many as images you want on your web page, without worrying about its load time.
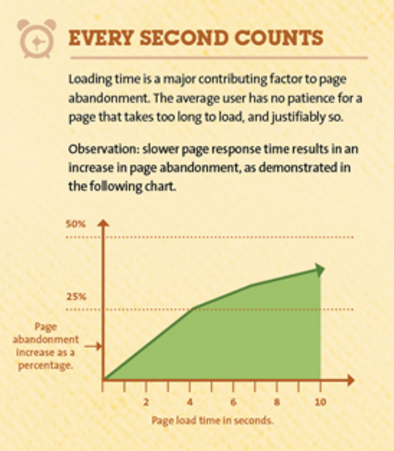 Image Source: Kissmetrics
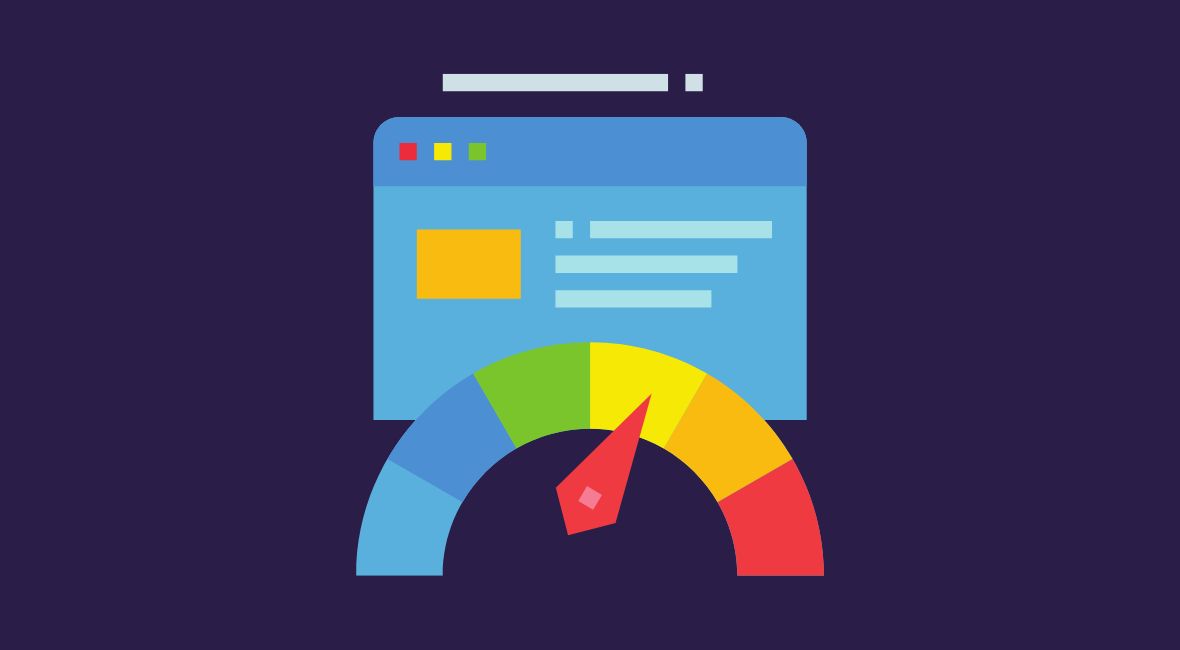
Before we go into the details, how about you check the speed of your own website?
Using the Pingdom Website Speed Test, you can see if images are slowing your site down. This test will tell you your overall load time and site size. Best practice is less than 3 seconds and smaller than 1mb.
40% of people abandon a website that takes more than 3 seconds to load.
Image optimization for WordPress websites is very important. Failing to do so, you risk sabotaging your conversion rates, damaging your revenue and diminishing your SEO rankings. It is one of the most effective steps you can take to transform your site from good to great.
Image optimization refines images so as to lighten pages and reduce load times.
It helps to lessen the burden of network resources, including data usage in the case of mobile data plans. By optimizing your images you can fit more images into a limited space.
Want your business website to be optimized? WPCruiseControl provides the best support and maintenance service to your website, to make your business flourish.
In this post, we’ll cover some of the best practices of image optimization for WordPress websites to ensure that your website isn’t too heavy or slow for your visitors.
Why Is There A Need For Image Optimization?
According to HTTP Archive, images tend to make up the largest portion of an individual web page’s size. Image optimization for WordPress can often yield some of the largest byte savings and performance improvements for your website.
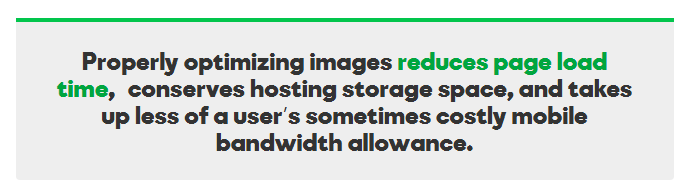 Image Source: GoDaddy
The fewer bytes the browser has to download, the less competition there is for the client’s bandwidth and the faster the browser can download and render useful content on the screen.
Finding the optimal settings for your image requires careful analysis along with many dimensions: format capabilities, the content of encoded data, quality, pixel dimensions, and more.
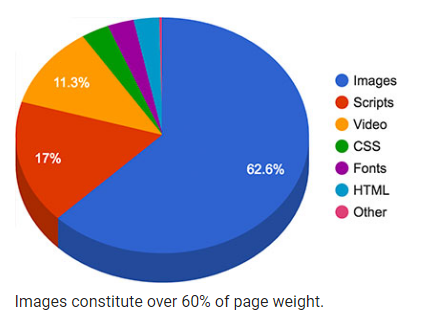 Image Source: Google
Good design is simple and will always yield the best performance. A well-placed image can also communicate more information than a thousand words. And if you can eliminate an image resource, which often requires a large number of bytes relative to HTML, CSS, JavaScript and other assets on the page, then that is always the best optimization strategy.
Online Image File Type
Image Optimization is fairly an easy process. But before we get into that, let’s look at all the types of images that you could fit into your WordPress website.
1. Vector Images
Vectors are images generated mathematically from basic geometrical shapes such as points, lines, and curves. They’re perfect for illustrated elements such as backgrounds or logos, and their file sizes are typically tiny.
When you enlarge a vector graphic, the math formulas stay the same, rendering the same visual graphic no matter the size. They can be scaled to any size without their losing quality.
A Scalable Vector Graphic (SVG) is the description of an image as an application of the Extensible Markup Language (XML). SVG images can easily be made scalable. Raster images, on the other hand, is a fixed-size bitmap. Thus, the SVG format enables the viewing of an image on a computer display of any size and resolution.
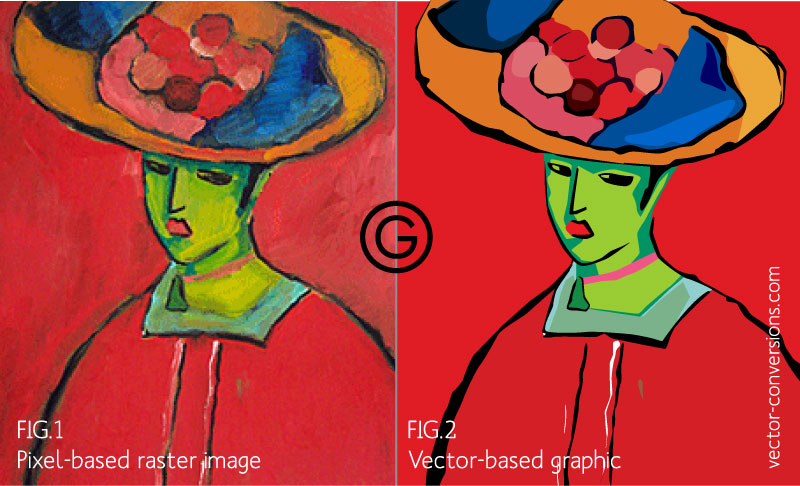
Image Source: vector-conversions
2. Raster Images
Raster images contain a rectangular grid of pixels. If you zoom into a raster image you may start to see a lot of little tiny squares.
A raster image has a specific number of pixels. If you enlarge the image file without changing the number of pixels, the image will look blurry. But if you enlarge files by adding more pixels, the pixels get added randomly throughout the image. This rarely produces good results.
There are 3 main file types in Raster Images:
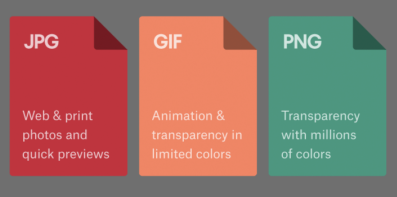 Image Source: 99Designs
1. GIF – Graphics Interchange Format
Invented in 1987, GIFs are the grand old man of the online image world. Their small file size, a limited color palette of 256 colors and support for transparency made them the workhorse of the early web, and a go-to solution for images primarily containing text and/or areas of flat color.

Image Source: Giphy
2. JPEG – Joint Photographic Experts Group
JPEGs have been the universal standard for displaying photos online since the first days of the web and continue to be used on over 70% of websites worldwide. Their lossy compression basis makes them excellent candidates for heavy optimization and they are perfect for images with a large range of colors and gradients. The one downside is their lack of support for transparency.
3. PNG – Portable Network Graphics
Originally invented as a response to possible licensing issues with GIFs, PNGs provide lossless compression, transparency support, and superb image quality. The 8-bit format makes a natural replacement for GIFs and results in smaller file sizes, while the 24-bit and 32-bit variants offer an excellent alternative to JPEGs. The potential downside is the larger file sizes that can result.
Image Optimization On WordPress Websites
Step 1: Resize The Image
Great screenshots can add a lot of value to your content. If you take an image of your whole screen and then try to shrink it down to a third of its original size, it will distort the image. The text will look blurry and edges will begin to look fuzzy.
Here are two things you can do while taking a screenshot:
- Resize the browser, not the image. Resizing an image from 800px to 640px is much easier and smoother than 2400px to 640px.
- Instead of taking a screenshot of the full app or the full screen, just focus on the most important area of the screenshot.
Photoshop is the industry standard for resizing images, but use whatever software you’re comfortable with. There are free tools like Paint for Windows and Preview for Mac that can function as perfectly adequate image resizing tools in a pinch.
Gimp provides a free, cross-platform, open-source desktop solution. Online-only options such as Pixlr and Fotoflexer are also available.
As WPMUDev sums up in their blog post, “Regardless of the solution you end up going for, bear the following points in mind at all times when resizing your images:
- Working on a copy of the image (rather than the original high-quality source file) gives you room to experiment and change your mind.
- Always be sure to maintain the original image’s aspect ratio without introducing optical distortion when resizing.”
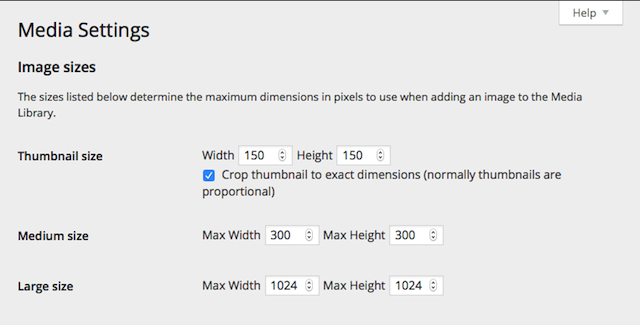
As a handy feature, WordPress automatically creates multiple versions of uploaded image files, with different dimensions to be used as thumbnails or inserted into posts.
Step 2: Save your resized image as PNG or JPEG
When using Photoshop and other image editing software, you can specify the file type you want to save as. The overwhelming majority of online images fall under two file formats – JPEG and PNG.
So which one should you use? Well, that depends. Both options have advantages and disadvantages, and the choice largely depends on the scenario. Choosing the right file type can keep your image looking clear and crisp without sacrificing speed.
JPEG – Good for photos of people, places, or things, but bad for screenshots of apps and websites or text.
PNG – Good for screenshots of apps and websites with gradients. It keeps text looking clean as well, but can be problematic for file sizes.
GIF – Good for flat images with no gradients or a short animation. Watch out for small images inside a screenshot like a profile picture or a gradient like the top bar of a browser. These never look good in a GIF.
With your image cropped, resized and saved, you’re ready to compress.
Step 3: Reduce file size with modern image compression
The goal of image compression is to reduce the size of the image file without substantially altering its appearance. It does that by algorithmically removing image information that the human eye can’t perceive.
JPEG undergo lossy compression that can introduce visual artifacts but reduces file size more. On the other hand, PNGs undergo lossless compression that retains perfect visual quality.
Modern compression tools analyze an image to dramatically reduce the file size without noticeably altering its quality.
For Mac users, ImageAlpha and ImageOptim are free desktop applications that optimize PNGs, while JPEGmini handles JPEGs. Platform agnostic web services like TinyPNG and Kraken.io optimize your uploaded image file and provide a download link to the optimized version.
There are also a number of offline apps for both major platforms dedicated entirely to image compression. The leading options here are ImageOptim on the Mac or Trimage on both Mac and Windows.
Step 4: WordPress plugins for image optimization
By using WordPress plugins, you’ll have the ability to upload un-optimized JPEG and PNG files and have the plugin replace them with optimized versions. You do lose the ability to tweak each image and a paid service might be required to substantially reduce file size.
Here are some WordPress plugins that you can use for image optimization for WordPress websites to enhance the overall loading speed of your website.
EWWW Image Optimizer automatically optimizes any image you upload to your blog as long as they’re either JPG, PNG, or GIF files. One of the advantages of EWWW Image Optimizer is that the optimization process takes place within your own servers by default, instead of connecting to a third party service. This means your optimization tasks will require less time.
2. WP Smush
WP Smush is WPMU DEV’s image optimization plugin, available in both free and premium formats. The plugin also packs a bulk optimization option, which as its name implies, enables you to tackle multiple tasks at once. By default, WP Smush uses lossless optimization techniques.
The Kraken Image Optimizer enables you to optimize PNG, JPG, and GIF files through its own API. By default, the Kraken Image Optimizer will optimize your images using an ‘intelligent lossy’ compression profile, which is designed to yield drastic savings without notably impacting image quality.
4. Optimus
This plugin can optimize the images up to 70% which will save a lot of bandwidth for you and make your site quick. As you upload the images on your site, the plugin sends those to the Optimus server simultaneously and send you the optimized version. Optimus has a simple settings menu, which makes it a good choice if you’re looking for sheer performance and are not interested in fine-tuning the details of the optimization process.
CW Image Optimizer is another plugin that automatically and losslessly optimizes your images as you upload them to your site, and can optimize images previously uploaded. CW Image Optimizer plugin uses image optimization programs offered by Linux to reduce the size of the images thereby enhancing the performance of the website.
While optimizing your images won’t make your site magically load in milliseconds, it’s one of those things that show you take every detail into consideration.
There are more plugins that help in image optimization for WordPress websites, these are some of the sources to find the best ones:
- 10 Best Image Optimization WordPress Plugins
- Best Image Optimization Plugins for Speeding Up WordPress
- 10 Best WordPress Image Optimization Plugins
How To Optimize Images For SEO
Optimizing your images not only helps your WordPress site load faster but can also boost your SEO.
- Filenames: Use descriptive filenames that include your keywords rather than meaningless default names.
- Captions: Not required for SEO but may be useful for on-page user orientation and reading flow. Use at your discretion.
- Image Relevance: Try to keep the Images as relevant as possible
- Image Size: After the recent Panda update, the loading time of pages has become a vital part of your SEO ranking as the total time of visit has become more important as an SEO algorithm.
- Alt tags: Every image should have a clearly written, non-spammy Alt tag for SEO and wider accessibility. You could possibly use your Focus Keyword as your Alt Tag.
- Image Hosting: It is said that images hosted on the same domain as the text are given more value than the images hosted at another domain like a free image hosting site. Another important algorithm for Google Image Search is how the images are blended with the text on the page.
- Image Linking: Avoid linking your images directly. Always use relevant anchor texts whenever linking your images. This is even more effective for your SEO when embedding images in a guest post or other pages intended to get a link back to your site.
- Title Tags: Title tag provides a tooltip when you hover your cursor over a link. Use relevant keywords and SEO friendly description and your title tags will rock.
Read our blog post on How Are SEO Title Tags Helping You Get On Top Of The Search Results for more info!
Best Practices For Image Optimization
1. Prefer vector formats because they are resolution and scale independent, which makes them a perfect fit for the multi-device and high-resolution world.
2. XML markup produced by most drawing applications often contains unnecessary metadata which can be removed. Ensure that your servers are configured to apply GZIP compression for SVG assets.
3. Experiment with optimal quality settings for raster formats. Don’t be afraid to dial down the “quality” settings, the results are often very good and byte savings are significant.
4. Remove unnecessary image metadata. Many raster images contain unnecessary metadata such as geoinformation, camera information, and so on. Use appropriate tools to strip this data.
5. Invest into automated tools and infrastructure that will ensure that all of your image assets are always optimized.
Image Optimization for WordPress websites is more important now than ever as mobile usage increases. It is one of the most actionable methods out there for adding instant improvements to your site across search rankings, user engagement, and increased mobile traffic.
By combining several of the strategies we have mentioned, you can make big savings to your image file sizes. Your website will load significantly faster and rank higher!
Read our WordPress Performance Optimization Chapter from our
WordPress Marketing Guide.
Understand the basics, learn the terminology of website performance tests and implement some simple website optimization tips.
Are there any other methods you use for Image optimization for WordPress websites? Let us know in the comments below!